Blog, Effect Pedal History
History of the MXR Phase 90 effect pedal
Do you know how to configure the MXR Phase 90‘s variable resistor to get the most of this pedal? How does the schematicwork and why does it have a non-filtering filter? Keep reading and learn these and many other curiosities about the MXR Phase 90.
In this second post about effect pedals we’ve decided to talk about the MXR Phase 90. This is one of the effect pedals that marked a turning point, becoming a reference for any future phase effect. It’s a quite easy pedal, but it delivers a huge variety of sounds. New as we were in the phase world when we started, we got information about the different phase effect pedals out there and realized than the MXR Phase 90 should be our first choice. After trying it, both in guitar and bass, we’re glad to say that we loved it!
Do you want to build your own MXR Phase 90? Get our Phase 90 full kit with all the parts you need to build your phase effect pedal! We also recommend you to check our post about how to make a perfect soldering to know all the tips to build your kit without any trouble.
1 – A BIT OF HISTORY ABOUT THE MXR PHASE 90 EFFECT PEDAL
The MXR Phase 90 is THE phase effect pedal. The circuit is composed by four phase shifting stages, and delivers the classic vintage phaser sound used by both amateur and well known musicians since decades. The MXR Phase 90 delivers a wide variety of tones. If we set it at a low speed it is specially interesting with rhythmic chords or arpeggios as it has a shifting wave motion sound, a great ressource when looking for psychedelic tones (you can hear it in almost any Pink Floyd record). The pedal can be combined with a distortion too at a more intermediate speed, like in Van Halen‘s Ain’t talkin’ bout love.

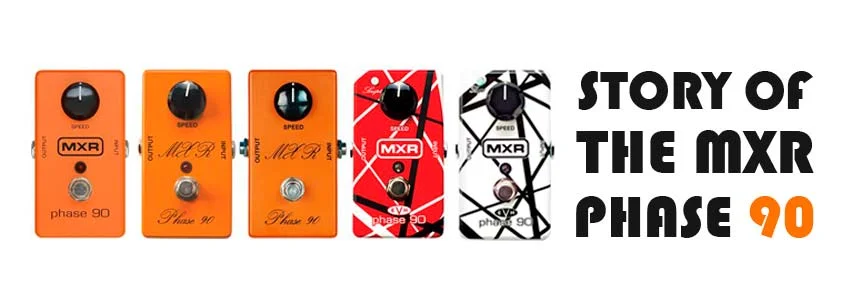
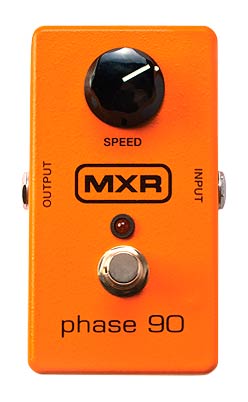
The Phase 90 was released in 1974, being the first effect pedal ever made by MXR, and it was a great market entry for them. The first version came in the characteristic orange enclosure with the MXR script logo, and in 1977 it was replaced by the block logo (the one you can see in the first picture in this post).
The production of the Phase 90 went on until 1984, when MXR went bankrupt. A bit later, the company was bought by Jim Dunlop resuming the production of the pedal with some circuit modifications. This made the new version of the Phase 90 not to sound as the previous one. After many user complains Dunlop released a second version of the pedal baptized as Eddie Van Halen signature Phase 90. This effect pedal is the same original version that was being produced by MXR before Dunlop bought the company, and had an enclosure with colors matching Van Halen’s guitar.
2 – THE MXR PHASE 90 EFFECT PEDAL SCHEMATIC
With the many reissues of this effect pedal there has been some changes in the schematic. The following circuit is the original MXR Phase 90 version, the one that captivated a generation of musicians (and that keeps on captivating them!) and the one we use in our MXR Phase 90 kit. We’ve divided the circuit in its different stages to make the analysis simpler.
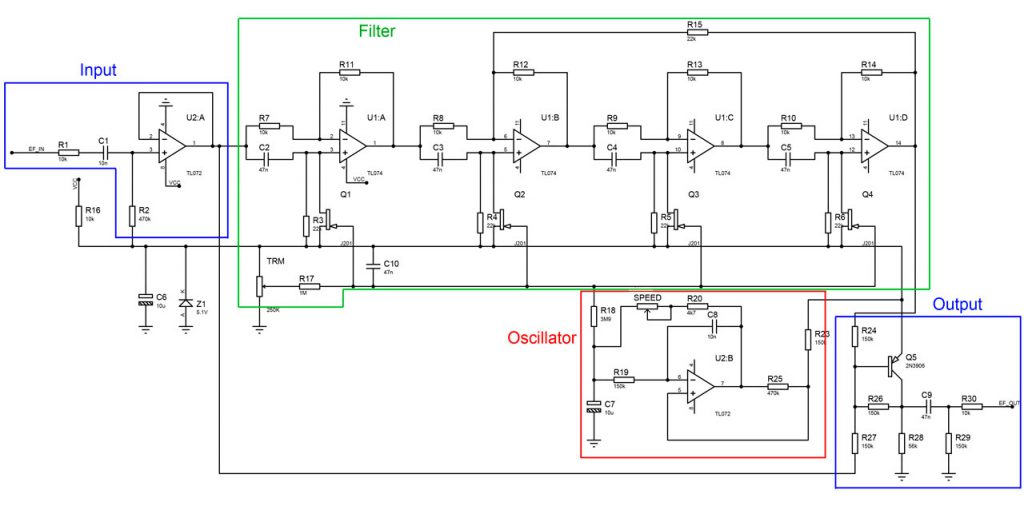
The input and output stages shouldn’t cause any confusion: an opamp in follower mode to get a high input impedance and a transistor based signal adapter for the output. This guarantees that the Phase 90 won’t load the guitar or bass pickups or any previous effect pedal, and that it will deliver enough amount of signal for the following ones.

In the middle sections of the pedal is when it gets interesting:
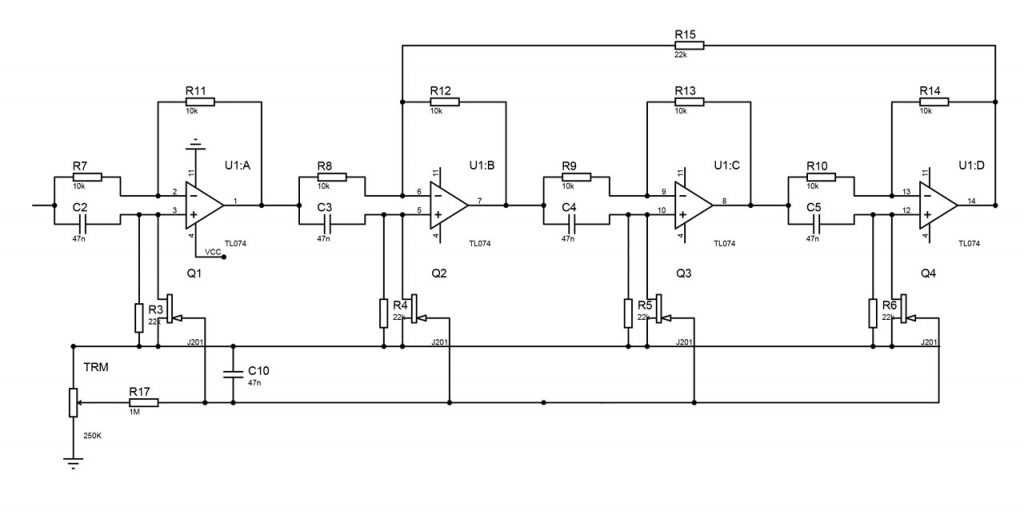
The previous configuration, despite looking quite complex, is no more than an all pass filter. That is, a filter that lets everything in the input to go through. “Then why do we need a filter that doesn’t filter?”. The most interesting thing about this filter is that it delays the signal. This is what will allow us to get the phase effect. Ignoring all the mathematical analysis, the MXR Phase 90 divides the input signal in two: one goes directly to the output and the other goes through the filter to be delayed, and the both of them are added together. Because of this delay, some of the frequencies have the same fase and others have an inverted phase when added, and some empty spaces or “holes” appear in the frequency spectrum. With the TRM trimmer we’ll set the transistor’s working point; here, they act as resistors that will determine the filter delay.

“And if we want resistors, why not to use resistors?“. The interesting about the phasing is not cancelling the same frequencies of the sound over time, otherwise we would have a static effect that wouldn’t be very noticeable: we want the cancelled frequencies to change. That’s what will make the MXR Phase 90 have a shifting wave motion. To get the filter delay to be variable we are going to use the J201 transistors as variable resistors: the voltage applied to their gate will set their equivalent resistance. The RC filter in the previous picture produces a waveform output signal that will be applied to the JFET J201transistors. The frequency of this signal is set by the capacitor C8 and the Speed potentiometer, and that’s what will allow us to adjust the phase effect speed. Lastly, in the output stage we’ll add the original signal with the one that has gone through the filter.
As you can see, if we divide the circuit in its different sections, it’s not hard to understand. But, one thing is the analysis and another one the design!
3 – HOW TO ADJUST THE DIFFERENT PARTS OF THE MXR PHASE 90
The MXR Phase 90 is usually qualified as a difficult effect pedal to build, when actually it isn’t hard at all. It just needs a couple settings to get everything working:
- The TRM potentiometer is a small trimmer directly soldered to the pcb, and it sets the working point of the transistors that will oscillate around it. This one is perhaps the most important setting, and you have to do it carefully. You won’t damage anything if the trimmer is not set properly, but the phase effect won’t sound at all and it will seem that the pedal is not connected. When setting it, it’s easier if someone else is playing the guitar while you slowly turn it to find the position where the phase effect is the most obvious. It’s a good idea to set the Speedpotentiometer to the maximum to make the phasing more obvious. Once you’ve find the right spot, don’t touch it anymore! This is the right position for the trimmer, and a slow variation will make the effect not to work as well as it should.
- Transistor selection. As the filter has four identical stages, it’s advisable to use transistors with similar gain parameters so they react the same way. Nevertheless, this is not as important as the trimmer setting (we even got our first Phase 90 working with different JFETs). Anyway, if you can get a bunch of them and select four that are quite similar, you’ll get better results. You can build a circuit with a small resistor voltage divider to set the gate voltage to around 2V, a 10k resistor between DC and drain, and a 10k resistor between source and ground. Check the voltage in the source pin with a voltmeter for each transistor and then get the four that have the most similar values (the absolute value doesn’t matter). These variations between transistors with the same name are due to being made by different manufacturers or to belonging to different transistor batches made by the same manufacturer. For our kits, we buy transistors in big batches from the same manufacturer to be sure that they have similar parameters.
If you want to build your MXR Phase 90 without having to worry about any of this issues, we recommend you to get our Phase 90 full kit. All the parts needed to build the effect pedal are included! Besides, you can check our post about soldering if you find yourself having troubles building your kit.
4 – HOW DOES THE MXR PHASE 90 SOUNDS?
Lastly, we’ve recorded some Phase 90 audio demos. We hope that you’ve learnt something new about this effect pedal. If you liked this post, share it!
Phase 90 Guitar Demo:
Phase 90 Bass Demo:
If you want to read about other essential effect pedals, check these posts!